Client Side
Client Side Implementation
Section titled “Client Side Implementation”Create a QR code embedded with 3 core pieces of information:
session_ID- Unique session identifiersecret- Challenge phrase for verificationtimestamp- When the QR code was generated
How it Works
Section titled “How it Works”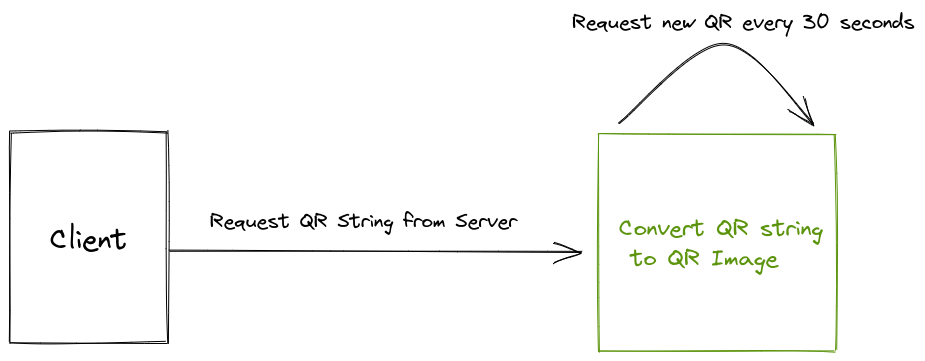
The client’s main role is to request a QR string from its server and refresh it every 30 seconds.
1. Generate QR Code
Section titled “1. Generate QR Code”Generate QR code using whichever client-side language you prefer. For our examples, we use QRious library.
Import via CDN
Section titled “Import via CDN”<script src="https://cdnjs.cloudflare.com/ajax/libs/qrious/4.0.2/qrious.min.js"></script>Import as JavaScript Module
Section titled “Import as JavaScript Module”npm install --save qrious# oryarn add qriousconst QRious = require("qrious");Now call the server side getQRCode() function to generate the string for our QR code containing the webhook URL.
getQRCode(); // QR code generating stringsetInterval(getQRCode, 30000); // QR update every 30 sec
var sid = "null"; // Initialize with no session
function getQRCode() {  $.get(    "/api/getqrcode?sid=" + sid,    {      csrf_param: csrf_token,    },    function (data) {      console.log(data.qr);     // the QR code string      console.log(data.sid);    // the current session      console.log(data.status); // in case user is already logged in
      if (data.status == 1) {        // logged in, redirect        location.href = "/site/dashboard?sid=" + sid;      }
      sid = data.sid; // set session      $("#loginQrcodeImgDiv").hide();      $("#qrious").show(); // show QR code
var qr = new QRious({ element: document.getElementById("qrious"), value: data.qr, size: 188, }); } );}<div class="row"> <!-- Byte Fast Auth QR Code section --> <div class="col-md-5"> <h5>...or use ByteVault for <i>FAST</i> login</h5> <div class="qrbox" style="border-left: 1px solid #ededed; margin-top: 50px;"> <div class="fast_login"> <div class="imgbox"> <div id="loginQrcodeImgDiv"> <span>Loading...</span> </div> <img id="qrious" height="188" width="188" style="display: none;"> <div id="loginSuccess" class="codeval ta-c" style="display: none;"> <div class="success"> <div class="icon"></div> <div class="title"><b>Scan successfully</b></div> </div> </div> </div> <div class="text"> Scan QR code to login<br> <a href="https://bytefed.us/wallet">Download ByteVault</a> </div> </div> </div> </div>
<!-- Your regular Login form --> <div class="col-md-7"> <h3>My Member Portal</h3> <h5>Please sign in to access...</h5> <form id="login-form" action="/" method="post"> <div class="form-group"> <input type="text" id="login-username" class="form-control" placeholder="Username"> </div> <div class="form-group"> <input type="password" id="login-password" class="form-control" placeholder="Password"> </div> <div class="form-group"> <button type="submit" class="btn btn-primary btn-block btn-lg"> Sign in </button> </div> </form> </div></div>2. Displaying the QR Code
Section titled “2. Displaying the QR Code”From the generated QR code, you can now display it on whichever client-side application you prefer. See the HTML code above for an example.
Example
Section titled “Example”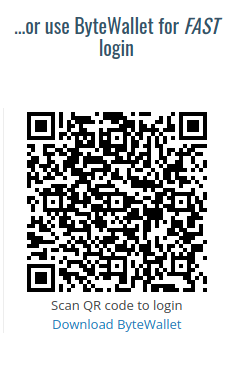
3. Poll For Status
Section titled “3. Poll For Status”Once the user is authenticated, the client needs to be redirected to the authorized page. The client implements a polling function that sends regular GET requests to check if the current session’s user was authenticated.
When the user is authenticated on the server, the polling request’s response status changes, triggering a redirect attempt.
Implementation
Section titled “Implementation”Poll the server with the session ID as a query parameter every 5 seconds:
setInterval(checkFast, 5000);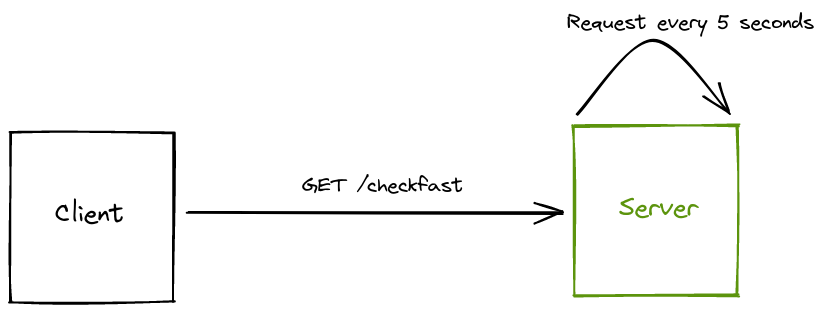
Example
Section titled “Example”checkFast(); // Poll authentication statussetInterval(checkFast, 5000); // Poll every 5 sec
function checkFast() { $.get("/api/checkfast?sid=" + sid, function (data) { if (data.status == 1) { // Attempt redirect if status changes to authenticated location.href = "/site/dashboard?sid=" + sid; } sid = data.sid; });}If location.href = "/site/dashboard?sid=" + sid succeeds, the user will see a rendered dashboard or account page (which was formerly restricted).